Android
How to create a new device
Device integration API allows to integrate new device types into the Huma SDK. This is useful when you want to add a new device type to the app that is not supported by the Huma platform.
Device integration interface and it's extension
The base interface for device integration is DeviceIntegration.
It describes a device, it's connection flow, and the meta data like device type, manufacturer, etc.
Additionally, it defines data types that are supported by the device. The Data types are defined in
SDK and used by 1st party modules.
If you have a custom module that needs to support a new device, you can define a new data type in
the module and use it in the device integration.
The DeviceIntegration interface has 3 extension interfaces:
DeviceIntegrationWithOptions- allows to pass additional options to the device integration. For example, you can pass a custom configuration to the device integration. Will be shown in the Device Settings screen.DeviceIntegrationWithDataCollectionFlow- allows to add a data collection flow to the device integration. For example, you can have a screen where you connect to your device, initiate a measurement session, and submit results.DeviceIntegrationWithBackgroundSync- allows to add a background sync to the device integration. For example, you can sync data from the device when the refresh event will be triggered by system or a user. As an example of this event is a user's manual pull-to-refresh action.
It is recommended to use one of the extension interfaces to implement the device integration.
Device integration implementation
To create a new device, you need to implement the DeviceIntegration interface and it's extension
class MyDevice : DeviceIntegration {
override val name: String = "Sample Device"
override val manufacturer: String = "Sample Manufacturer"
override val model: String = "Sample Model"
override val isDeviceConnected: Boolean =
true / false //return true if the device is connected, it will be used to show the connected state in the UI
override val canConnectToDevice: Boolean =
true / false //return true if the device can be connected, it will be used to show the connect button in the UI
override val supportedModuleDataTypes: List<KClass<out ModuleDataType<*>>> =
listOf(MyDataType::class)
override val lastSyncDateTime: Long? =
null //return the last sync date time, it will be used to show the last sync date time in the UI
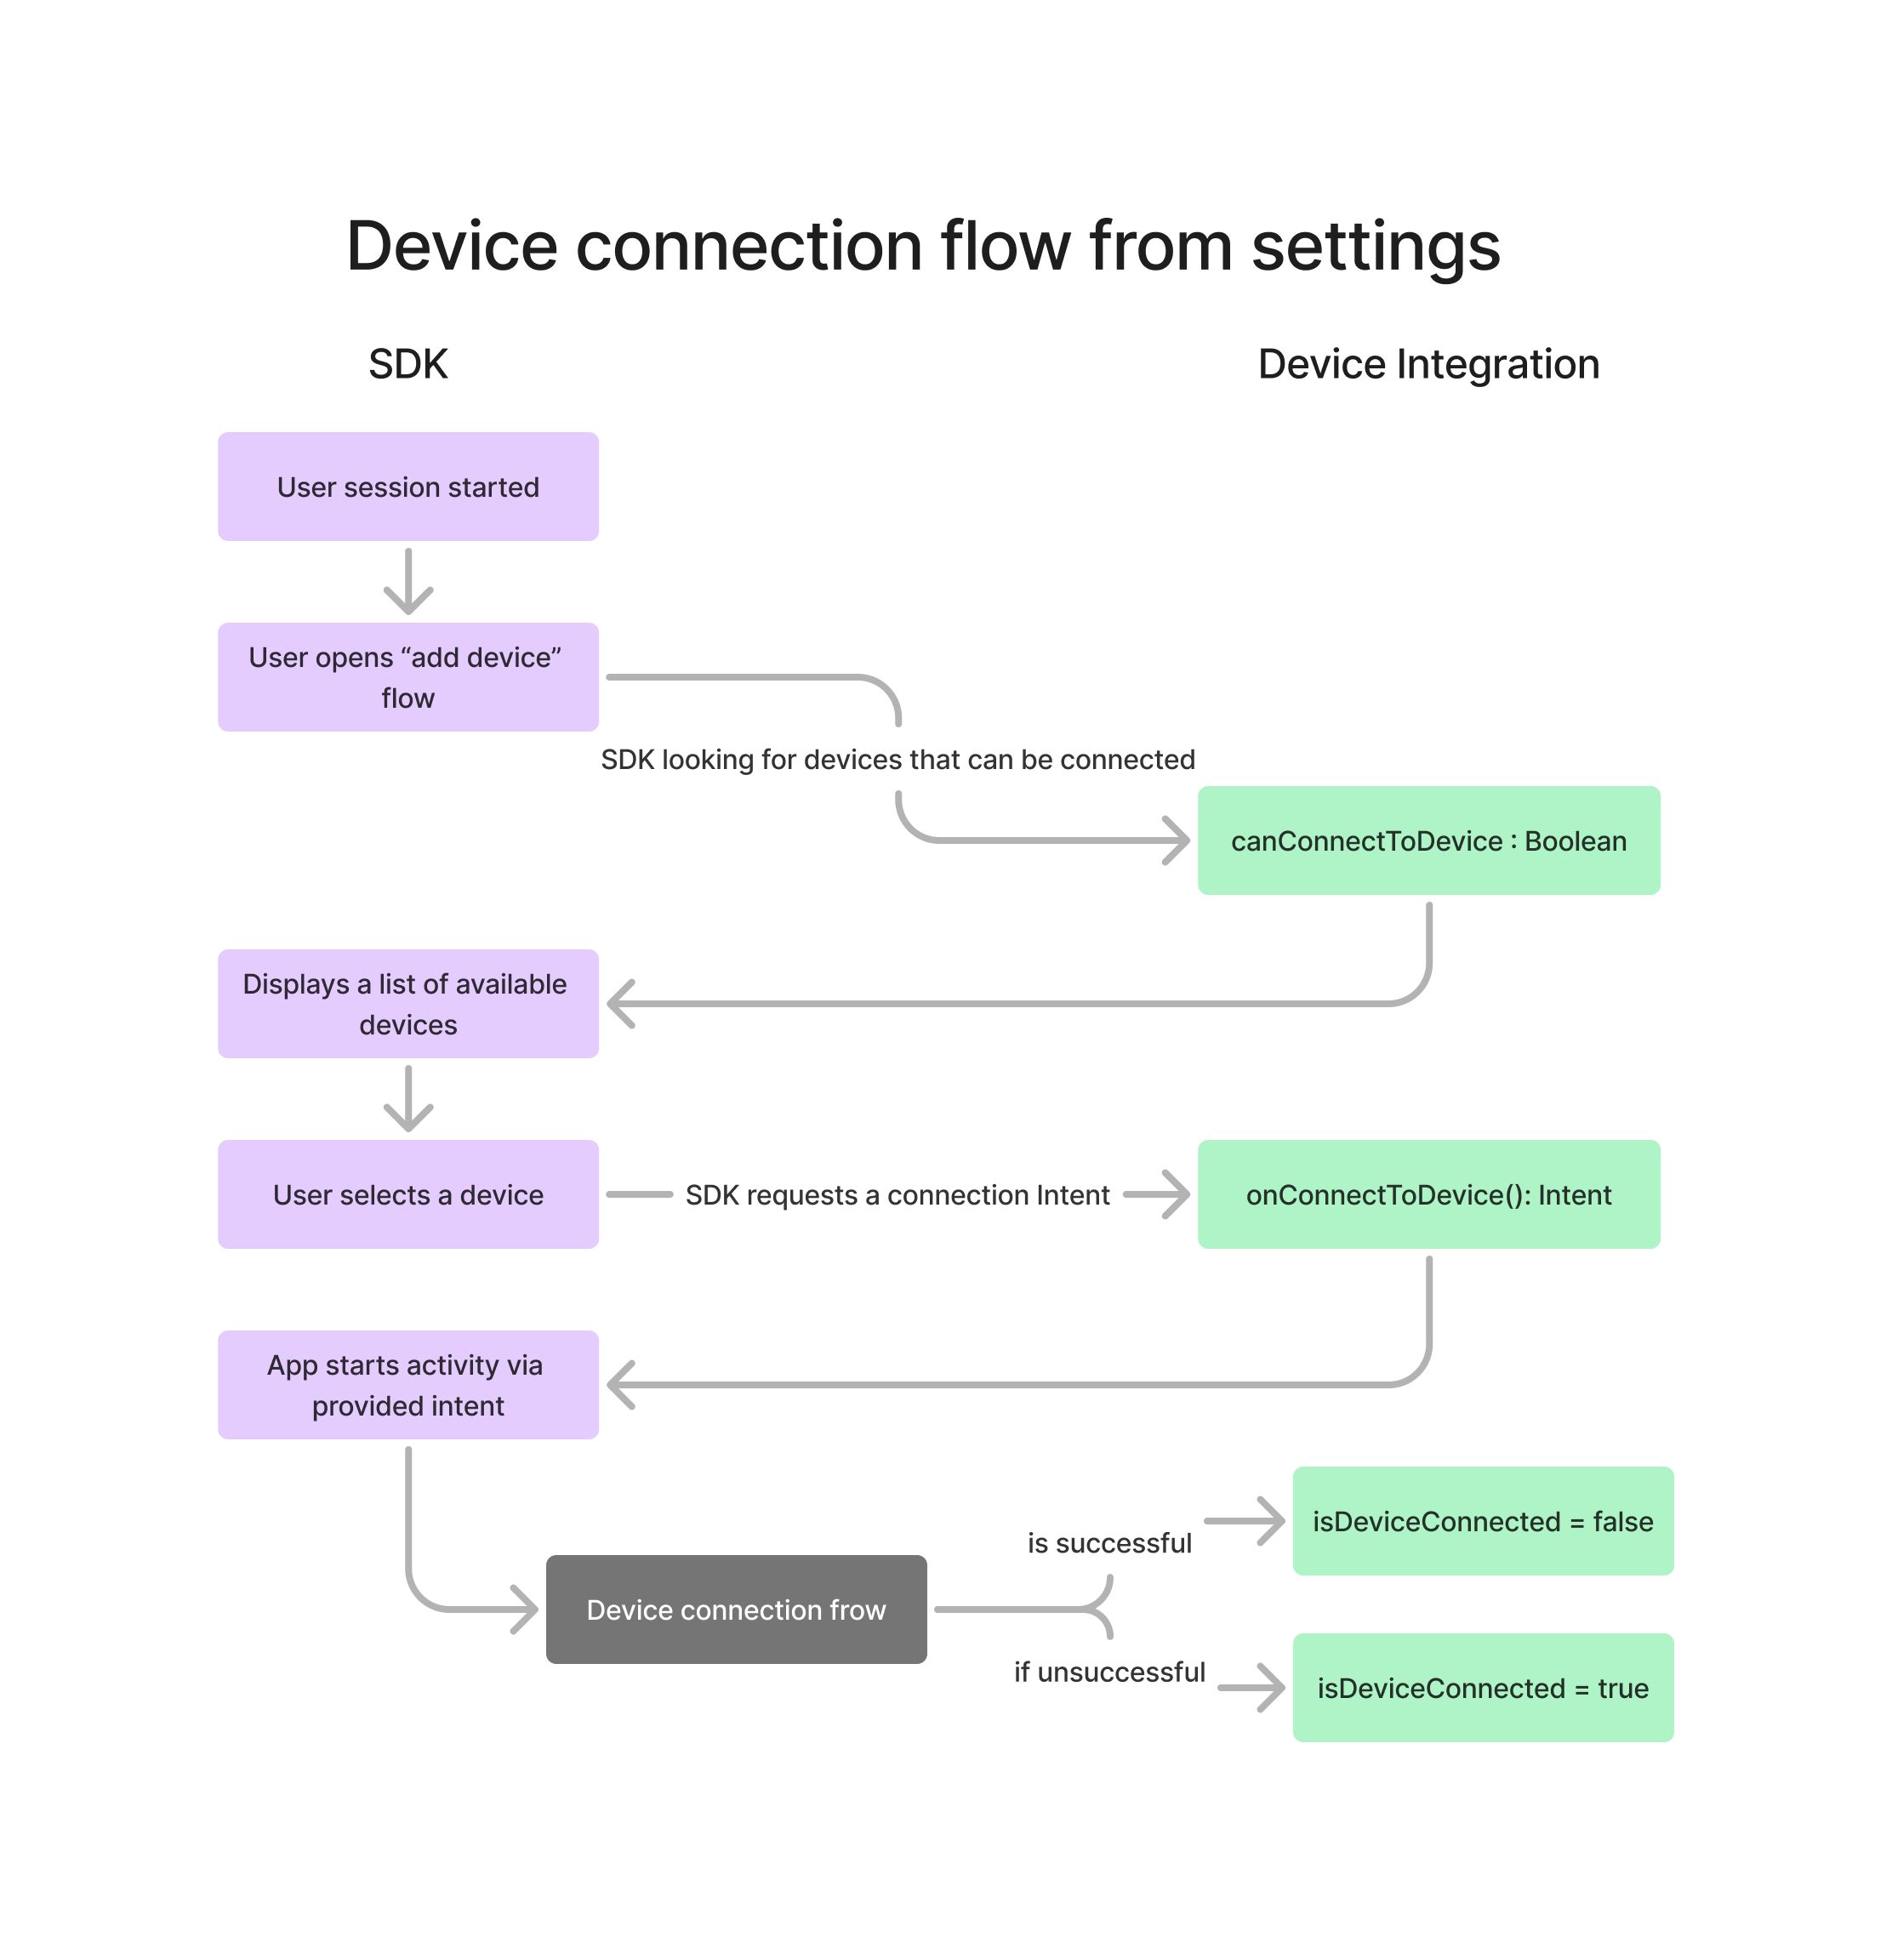
override suspend fun onConnectToDevice(context: Context): Intent {
return Intent(context, MyConnectActivity::class.java)
}
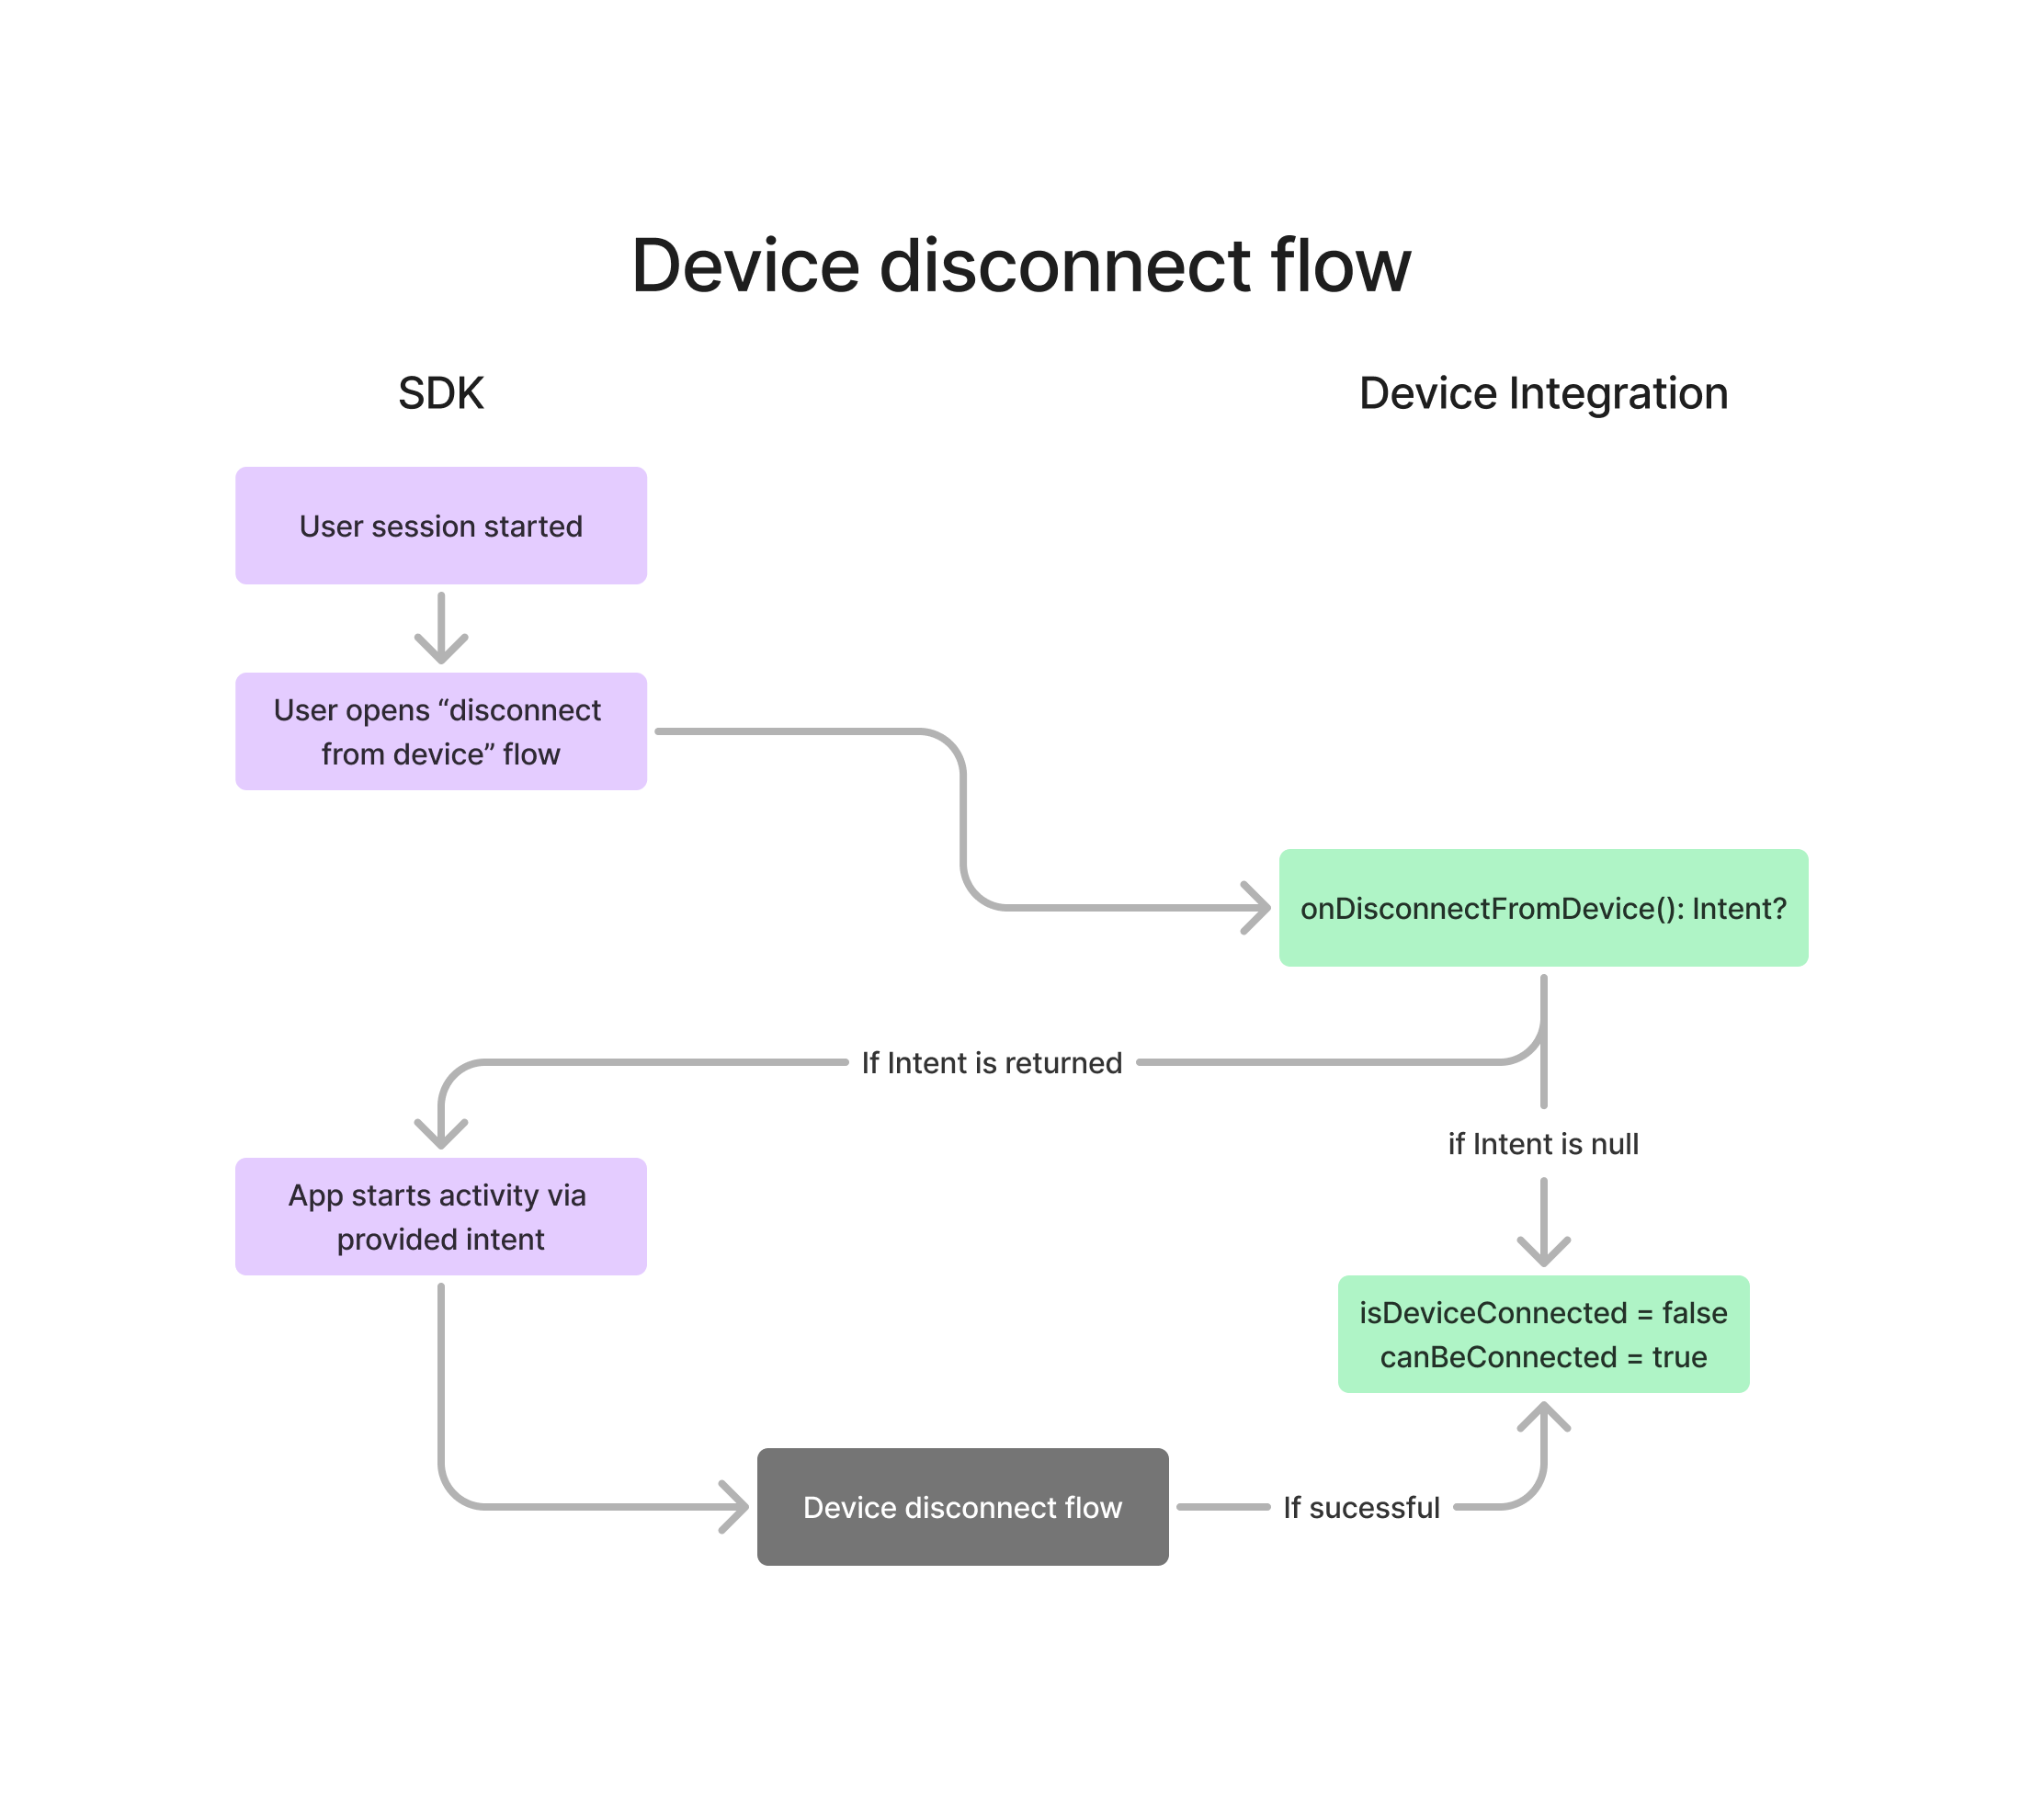
override suspend fun onDisconnectFromDevice(context: Context): Intent? {
//disconnect from the device without UI
disconnectFromDevice()
return null
//disconnect from the device with UI
return Intent(context, MyDisconnectActivity::class.java)
}
}
This diagrams represents the device connection flow lifecycle:
Next step is to implement the extension interface. For example,
DeviceIntegrationWithDataCollectionFlow:
class MyDevice : DeviceIntegration, DeviceIntegrationWithDataCollectionFlow {
    ... //DeviceIntegration implementation

    override suspend fun onOpenDataCollectionFlow(
        context: Context,
        range: Range?, //optional range for the data collection flow, can be ignored if not needed
        module: Module?, //if flow opened from the module, it will be passed here, otherwise it will be null
    ): Intent {
        return Intent(context, MyDataCollectionActivity::class.java).apply {
            putExtra("range", range)
            putExtra("module", module)
        }
    }
}
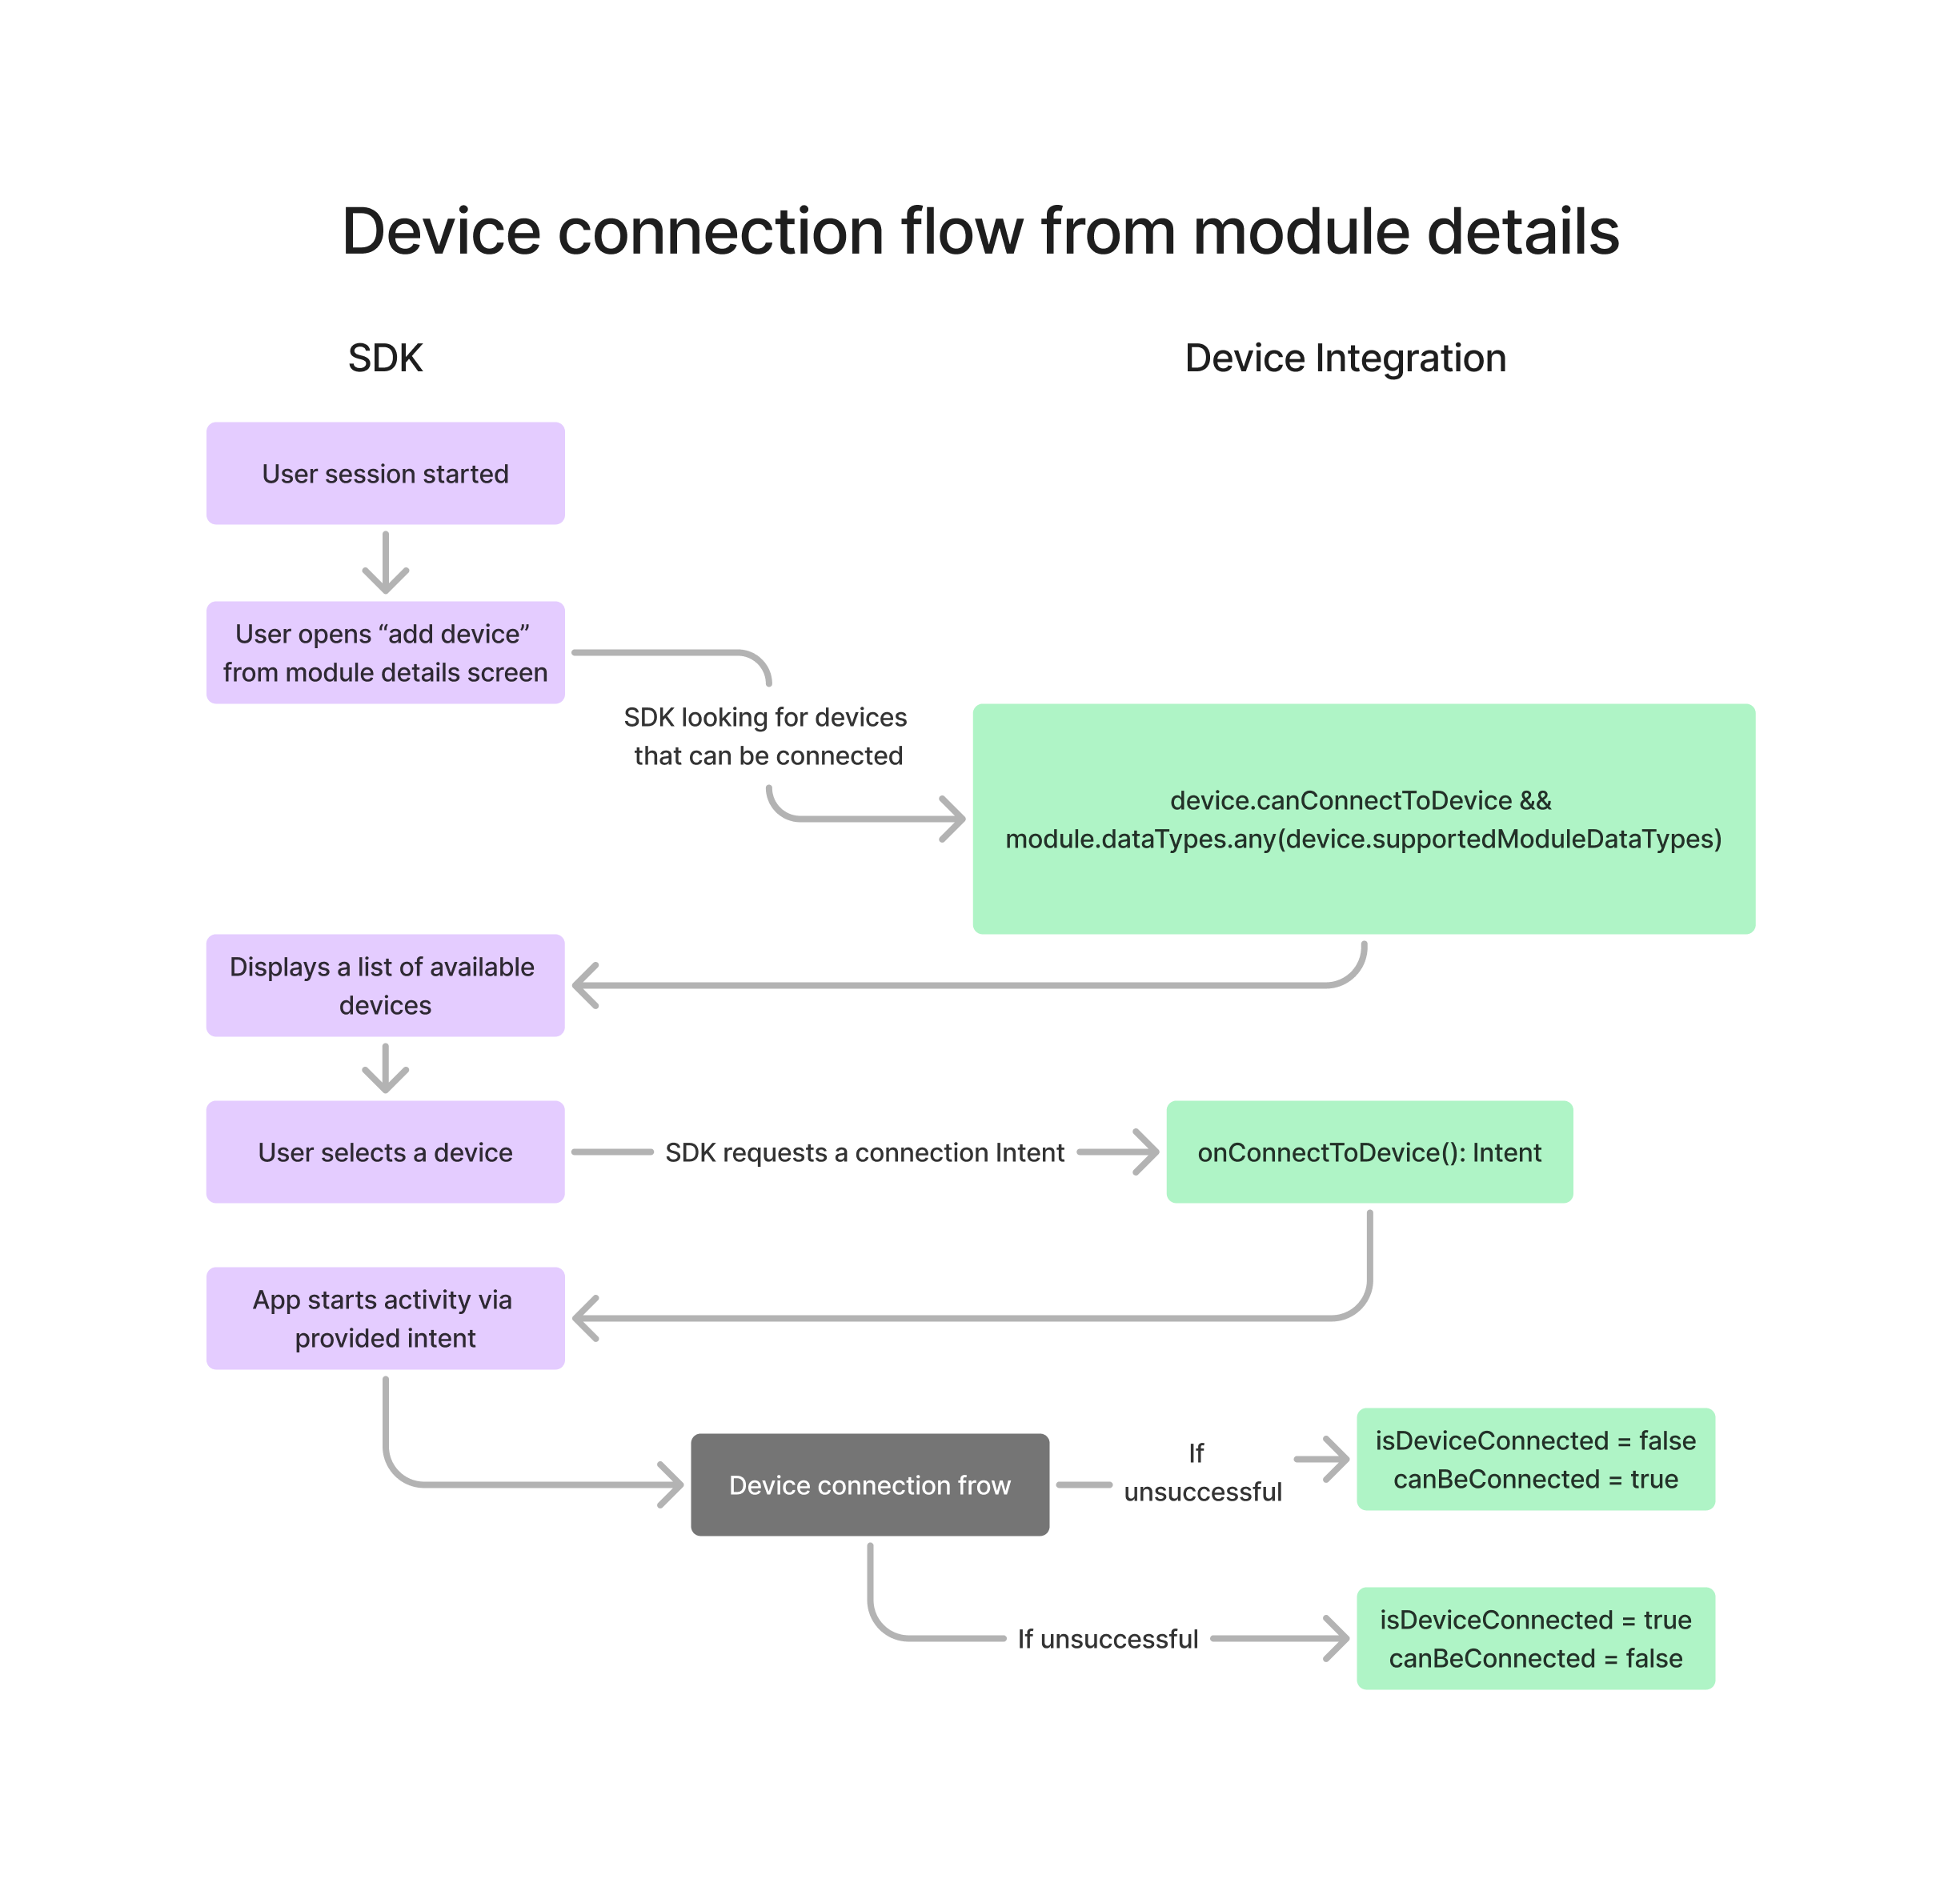
By implementing this interface, you will see "Sync" button in the device settings screen and in Module Details screen of the module that supports this data type.
This diagrams represents the data collection flow lifecycle:
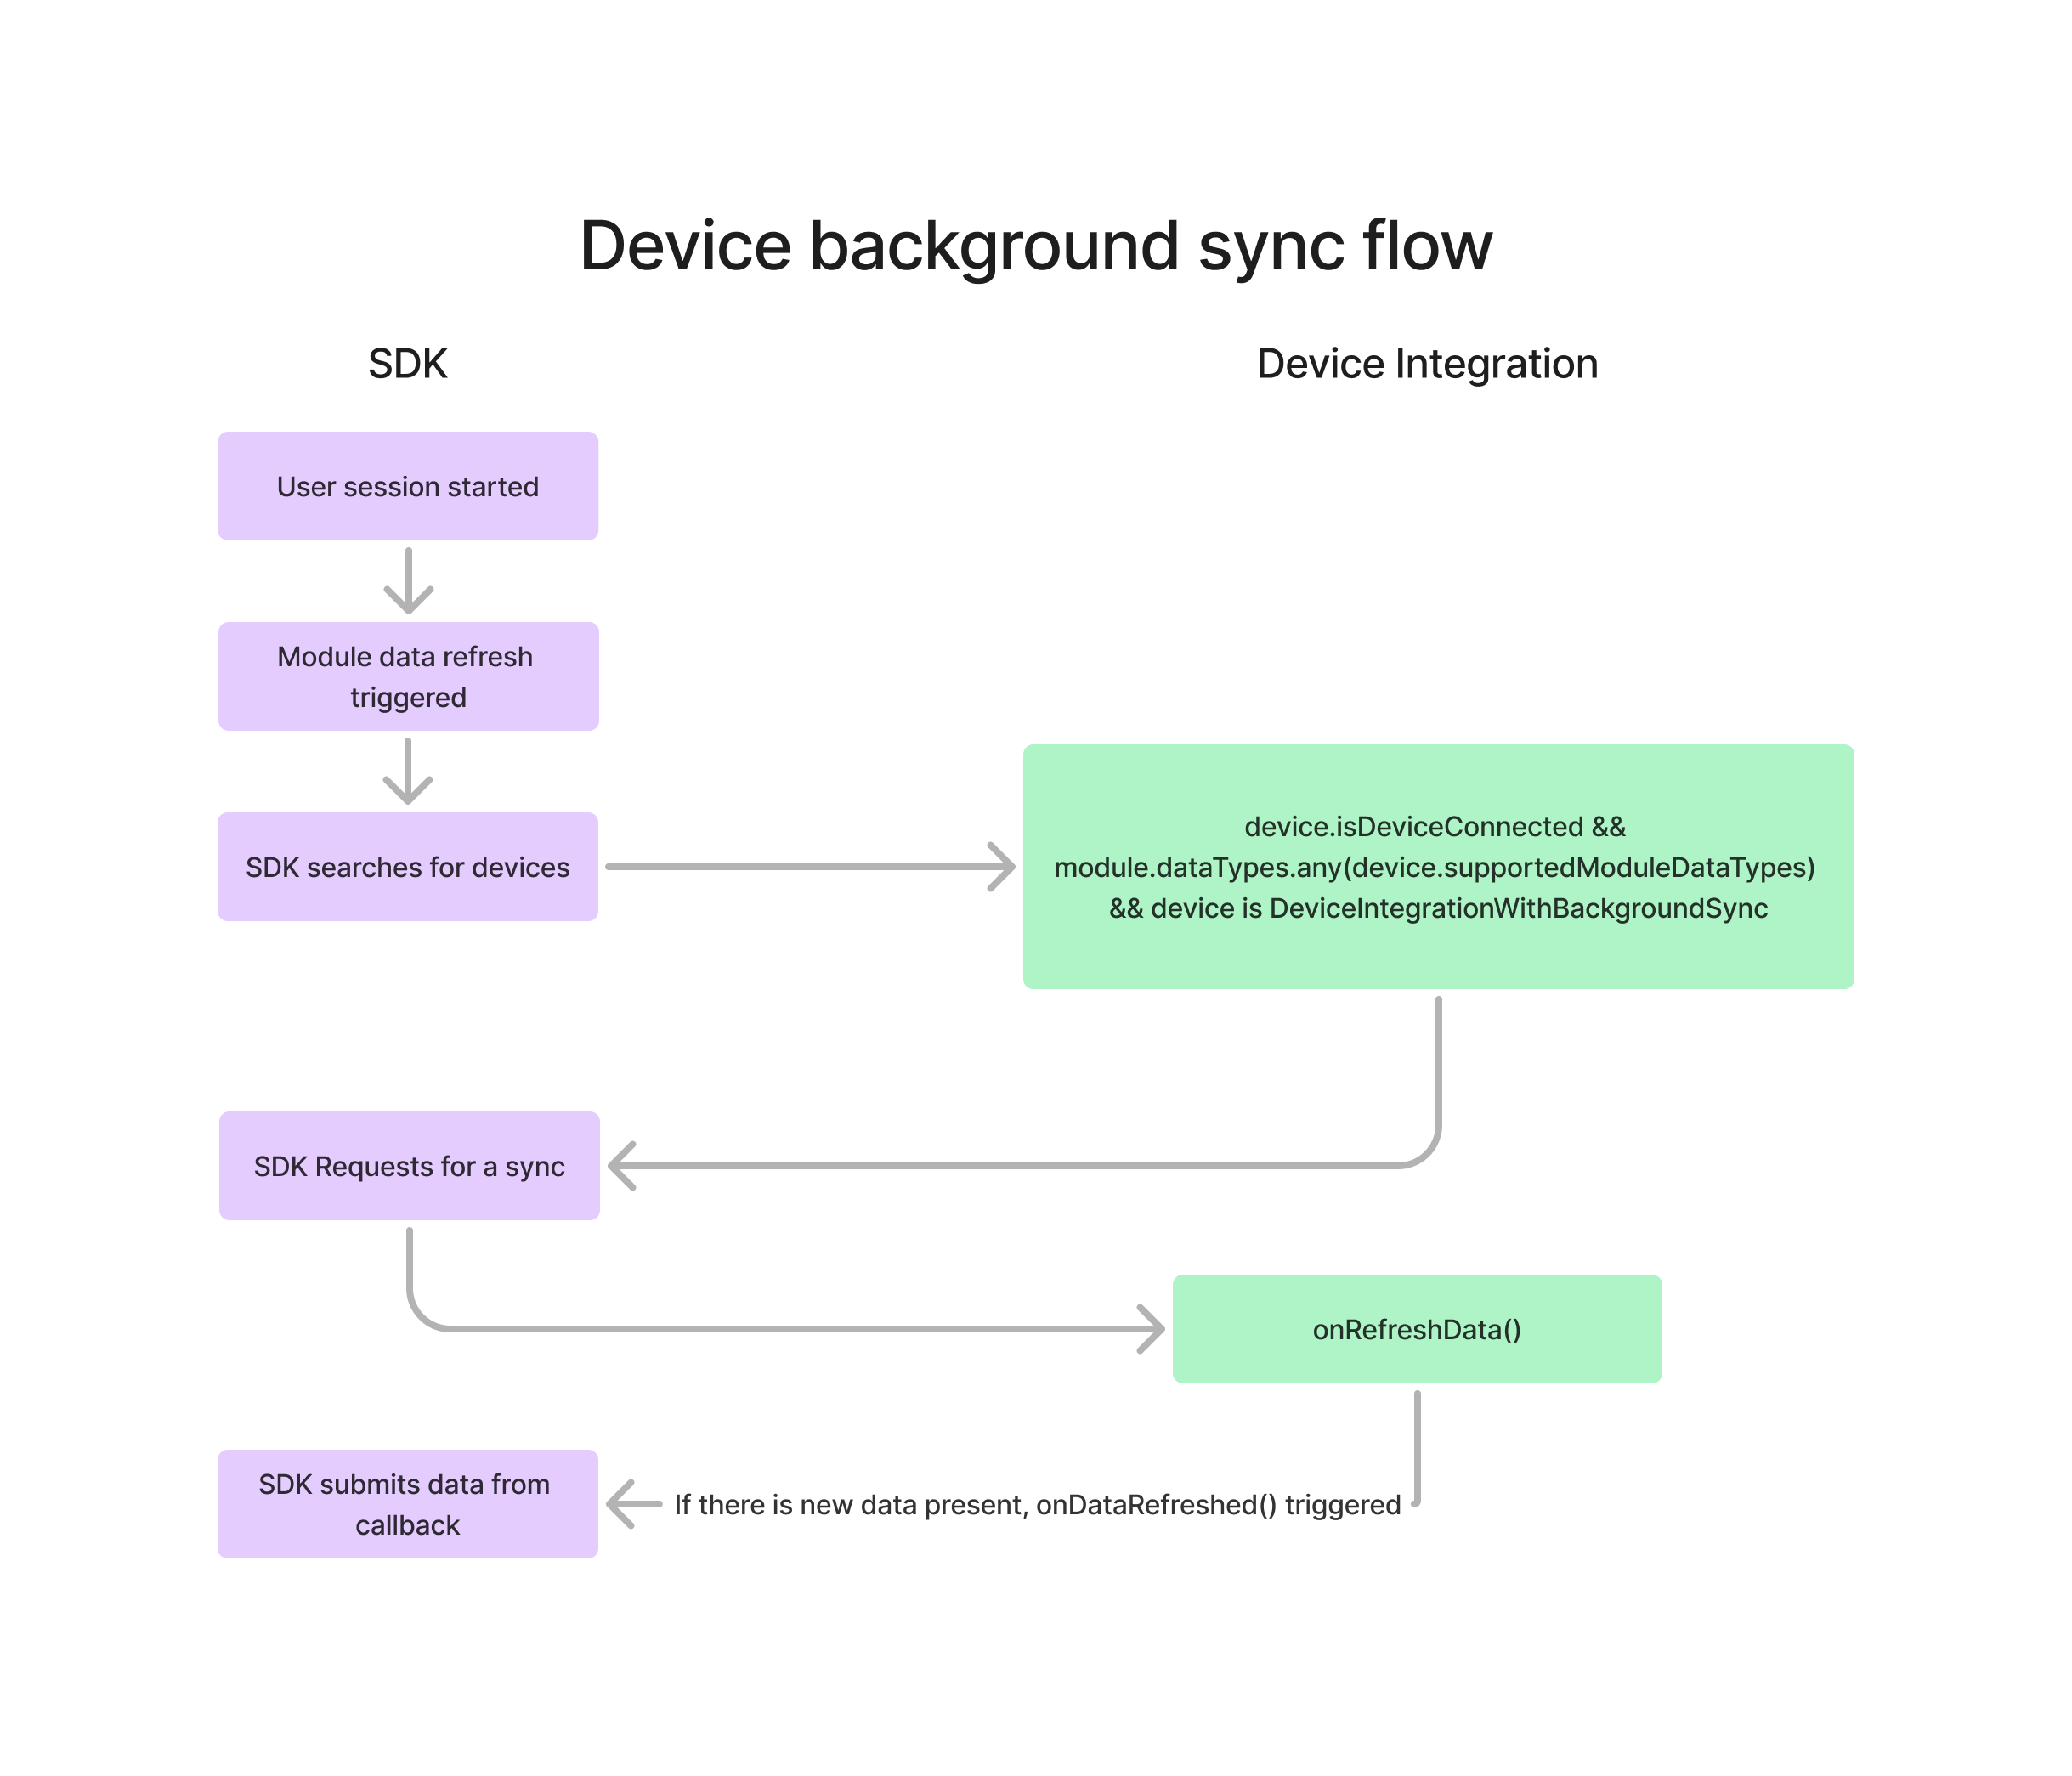
Let's implement the DeviceIntegrationWithBackgroundSync interface:
class MyDevice : DeviceIntegration,
    DeviceIntegrationWithDataCollectionFlow,
    DeviceIntegrationWithBackgroundSync {
    ... //DeviceIntegration and DeviceIntegrationWithDataCollectionFlow implementation

    override suspend fun onRefreshData(
        module: Module,
        range: Range?,
        onDataRefreshed: (ModuleDataType<*>) -> Unit,
    ) {
        //refresh data from the device
        onDataRefreshed(MyDataType(/*data*/))
    }
}
By implementing this interface, you will get a callback when the refresh event will be triggered by
system or a user.
If there is a new data available, you can call onDataRefreshed with the new data. Otherwise, you
can ignore the call.
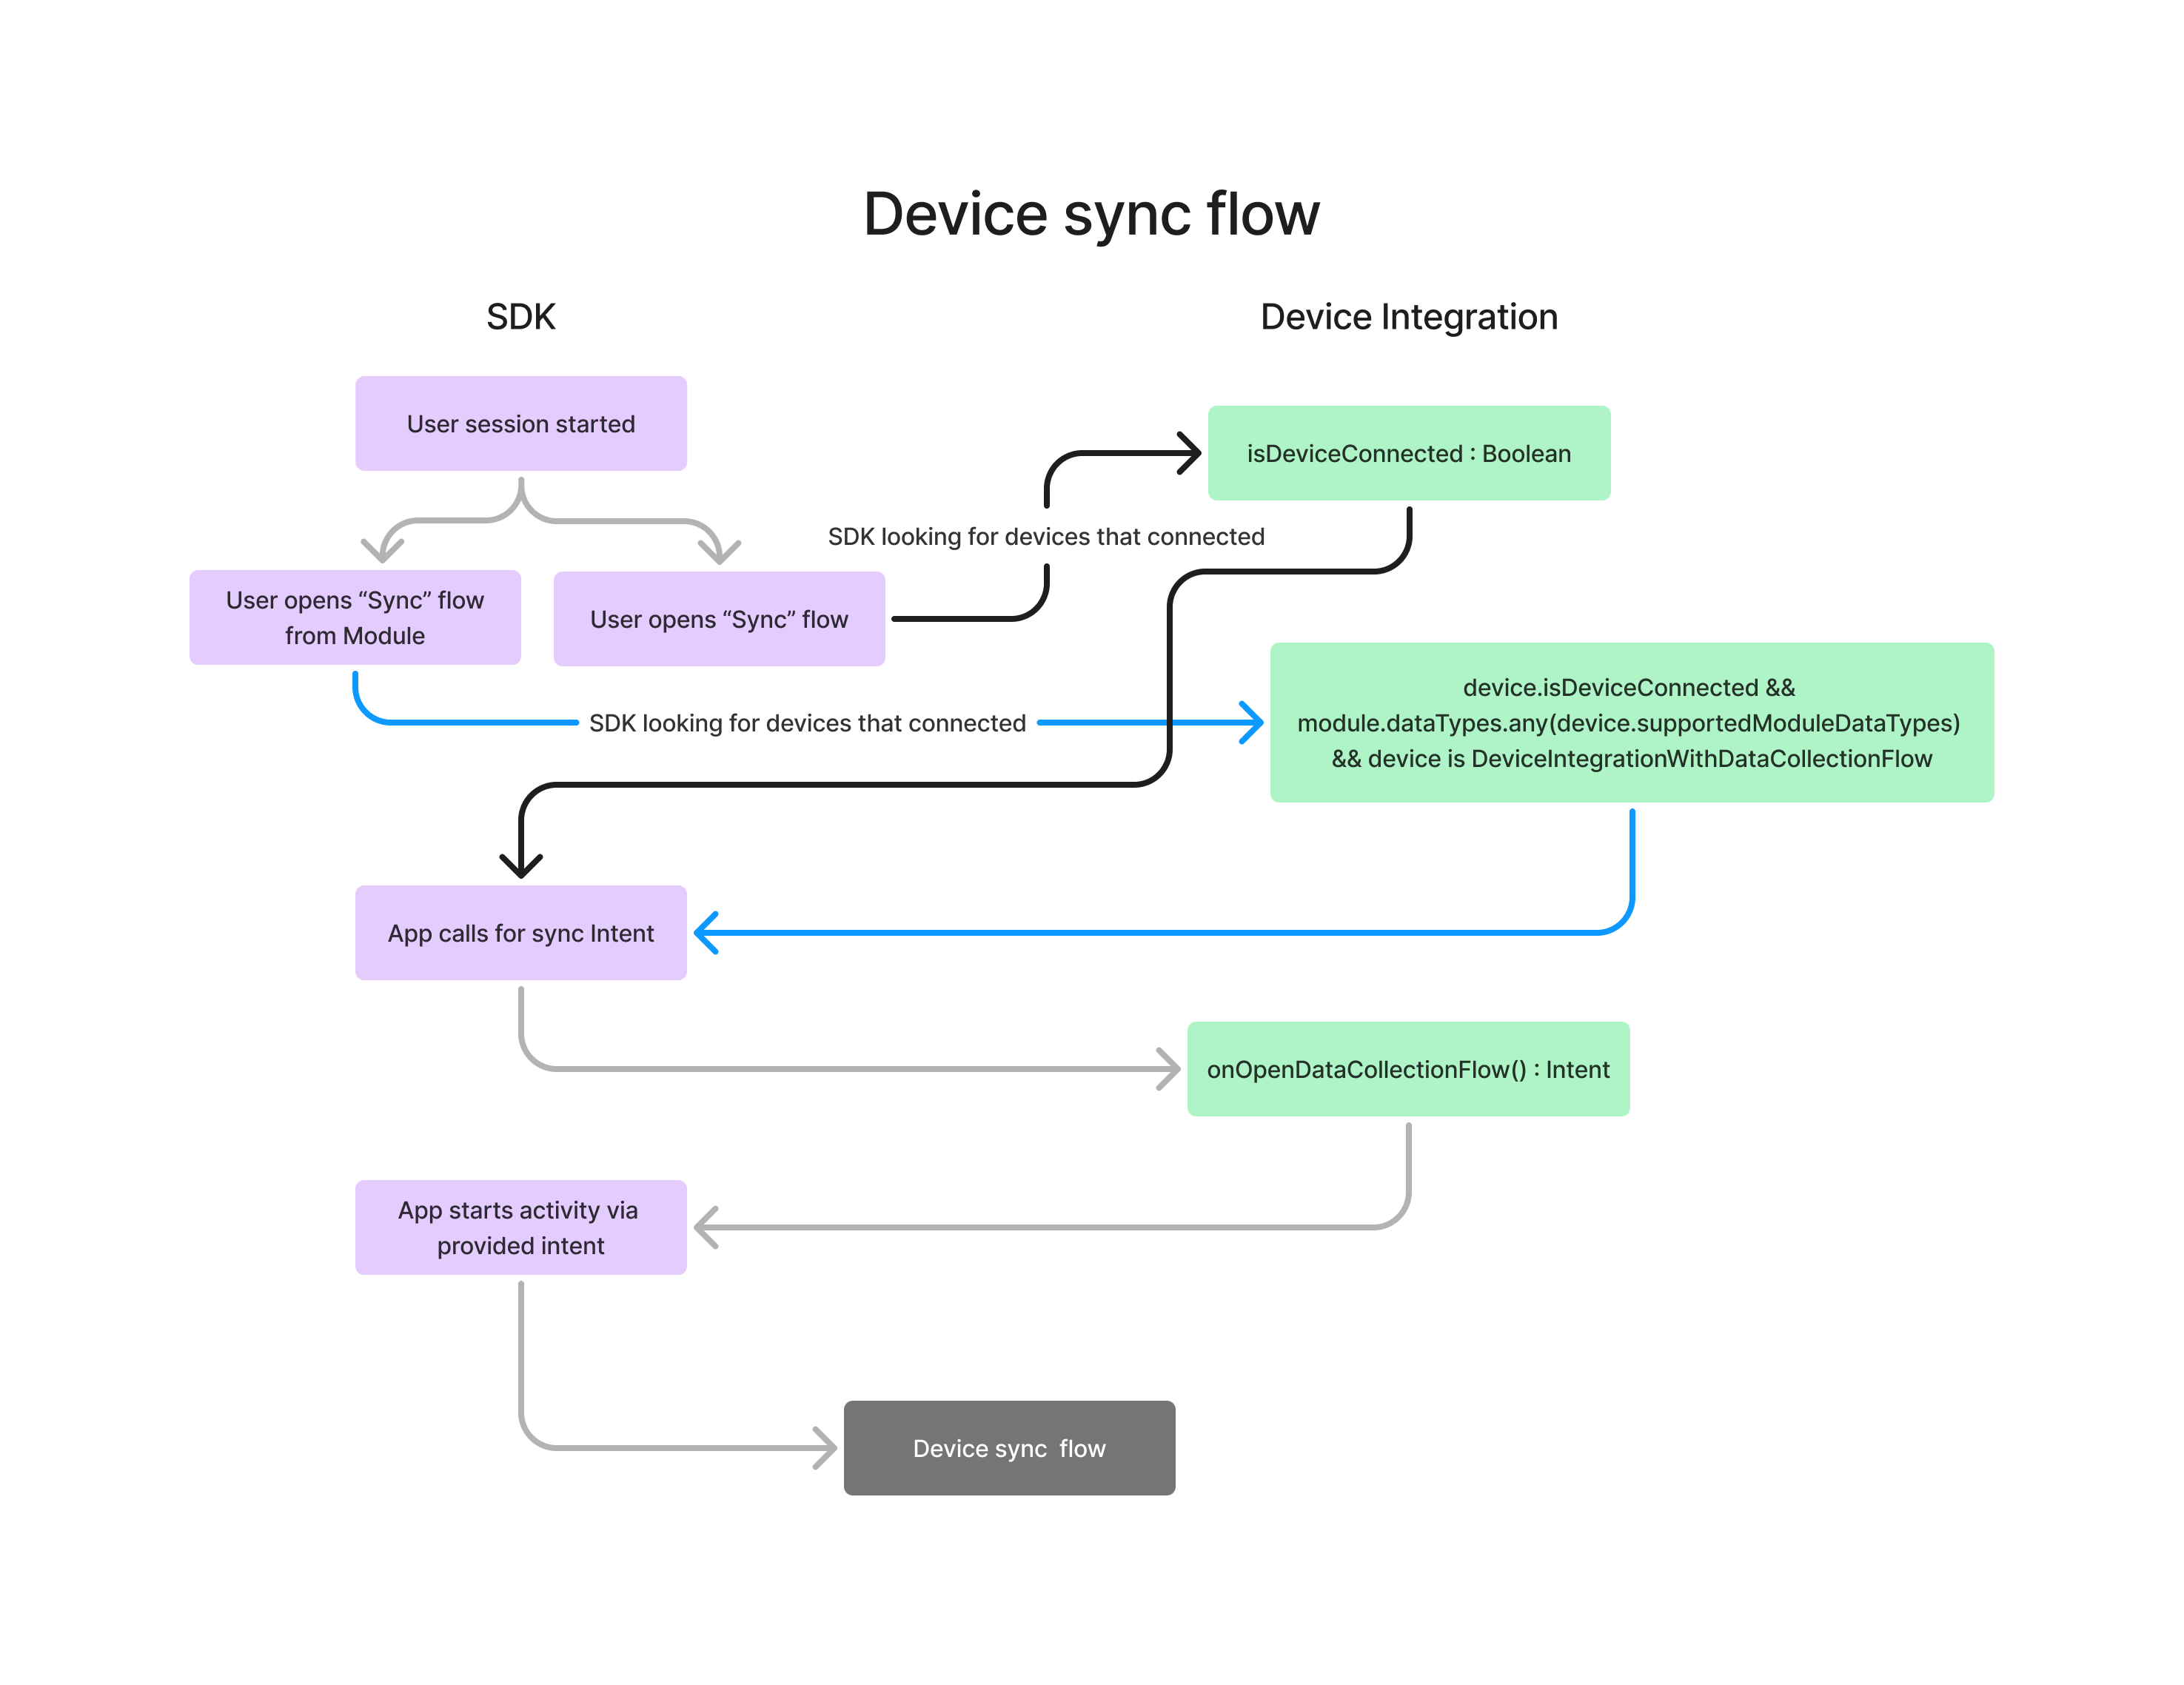
This diagrams represents the background sync flow lifecycle:
Finally, let's implement the DeviceIntegrationWithOptions interface:
class MyDevice : DeviceIntegration,
    DeviceIntegrationWithDataCollectionFlow,
    DeviceIntegrationWithBackgroundSync,
    DeviceIntegrationWithOptions {
    ... //DeviceIntegration, DeviceIntegrationWithDataCollectionFlow and DeviceIntegrationWithBackgroundSync implementation

    override val options: List<Pair<String, suspend (Context) -> Intent>> = listOf(
        "Option 1" to { context -> Intent(context, MyOption1Activity::class.java) },
        "Option 2" to { context -> Intent(context, MyOption2Activity::class.java) },
    )
}
By implementing this interface, you will see list of provided options as buttons in the device settings screen alongside with "Remove" button.
Device integration registration
When you have implemented the device integration, you need to register it in the SDK.
To do this, you need to create a DeviceIntegrationProvider and register it in the SDK.
class MyDeviceIntegrationProvider : DeviceIntegrationProvider {

    override fun getDeviceIntegrations(): List<DeviceIntegration> {
        return listOf(MyDevice()) //return list of device integrations, if your plugin has multiple devices, return all of them here or separate them into different providers
    }
}
Next, you need to register the provider in the SDK:
context.installHumaSdk {
    sdk {
        deviceIntegration {
            registerDeviceProvider(
                MyDeviceIntegrationProvider(),
                ... //register other providers if needed
            )
        }
    }
}
After that, you will see your device in the device list in the app in device settings screen and supported modules.